引言
在本指南中,会展示如何利用Monocle 3软件和单细胞ATAC-seq数据来构建细胞发展轨迹。
为了方便在Seurat(Signac所使用的)和CellDataSet(Monocle 3所使用的)这两种数据格式之间进行转换,将使用GitHub上的SeuratWrappers包里的一个转换工具。
数据加载
将采用一个单细胞ATAC-seq数据集,该数据集包含了由Satpathy和Granja等人发布的人类CD34+造血干细胞和祖细胞。
这个处理过的数据集可以在NCBI GEO数据库中找到链接:https://www.ncbi.nlm.nih.gov/geo/query/acc.cgi?acc=GSE129785
请注意,片段文件包含在GSE129785_RAW.tar压缩包内,但未提供该片段文件的索引。您可以使用tabix工具自行创建索引,例如命令:tabix -p bed <fragment_file>。
首先,将加载这个数据集,并使用Signac进行一些常规的预处理工作。
library(Signac)
library(Seurat)
library(SeuratWrappers)
library(monocle3)
library(Matrix)
library(ggplot2)
library(patchwork)

filepath <- "GSE129785_scATAC-Hematopoiesis-CD34"

peaks <- read.table(paste0(filepath, ".peaks.txt.gz"), header = TRUE)
cells <- read.table(paste0(filepath, ".cell_barcodes.txt.gz"), header = TRUE, stringsAsFactors = FALSE)
rownames(cells) <- make.unique(cells$Barcodes)

mtx <- readMM(file = paste0(filepath, ".mtx"))
mtx <- as(object = mtx, Class = "CsparseMatrix")
colnames(mtx) <- rownames(cells)
rownames(mtx) <- peaks$Feature

bone_assay <- CreateChromatinAssay(
  counts = mtx,
  min.cells = 5,
  fragments = "GSM3722029_CD34_Progenitors_Rep1_fragments.tsv.gz",
  sep = c("_", "_")
)
bone <- CreateSeuratObject(
  counts = bone_assay,
  meta.data = cells,
  assay = "ATAC"
)

# The dataset contains multiple cell types
# We can subset to include just one replicate of CD34+ progenitor cells
bone <- bone[, bone$Group_Barcode == "CD34_Progenitors_Rep1"]

# add cell type annotations from the original paper
cluster_names <- c("HSC",   "MEP",  "CMP-BMP",  "LMPP", "CLP",  "Pro-B",    "Pre-B",    "GMP",
                  "MDP",    "pDC",  "cDC",  "Monocyte-1",   "Monocyte-2",   "Naive-B",  "Memory-B",
                  "Plasma-cell",    "Basophil", "Immature-NK",  "Mature-NK1",   "Mature-NK2",   "Naive-CD4-T1",
                  "Naive-CD4-T2",   "Naive-Treg",   "Memory-CD4-T", "Treg", "Naive-CD8-T1", "Naive-CD8-T2",
                  "Naive-CD8-T3",   "Central-memory-CD8-T", "Effector-memory-CD8-T",    "Gamma delta T")
num.labels <- length(cluster_names)
names(cluster_names) <- paste0( rep("Cluster", num.labels), seq(num.labels) )
new.md <- cluster_names[as.character(bone$Clusters)]
names(new.md) <- Cells(bone)
bone$celltype <- new.md

bone[["ATAC"]]

## ChromatinAssay data with 570650 features for 9913 cells
## Variable features: 0
## Genome:
## Annotation present: FALSE
## Motifs present: FALSE
## Fragment files: 1
接下来可以将 hg19 基因组的基因注释添加到对象中。这对于计算质量控制指标(TSS 富集分数)和绘图非常有用。
library(EnsDb.Hsapiens.v75)

# extract gene annotations from EnsDb
annotations <- GetGRangesFromEnsDb(ensdb = EnsDb.Hsapiens.v75)

# change to UCSC style since the data was mapped to hg19
seqlevels(annotations) <- paste0('chr', seqlevels(annotations))
genome(annotations) <- "hg19"

# add the gene information to the object
Annotation(bone) <- annotations
质控
将计算每个细胞的 TSS 富集、核小体信号评分以及基因组黑名单区域中的计数百分比,并使用这些指标帮助从数据集中删除低质量细胞。
bone <- TSSEnrichment(bone)
bone <- NucleosomeSignal(bone)
bone$blacklist_fraction <- FractionCountsInRegion(bone, regions = blacklist_hg19)

VlnPlot(
  object = bone,
  features = c("nCount_ATAC", "TSS.enrichment", "nucleosome_signal", "blacklist_fraction"),
  pt.size = 0.1,
  ncol = 4
)
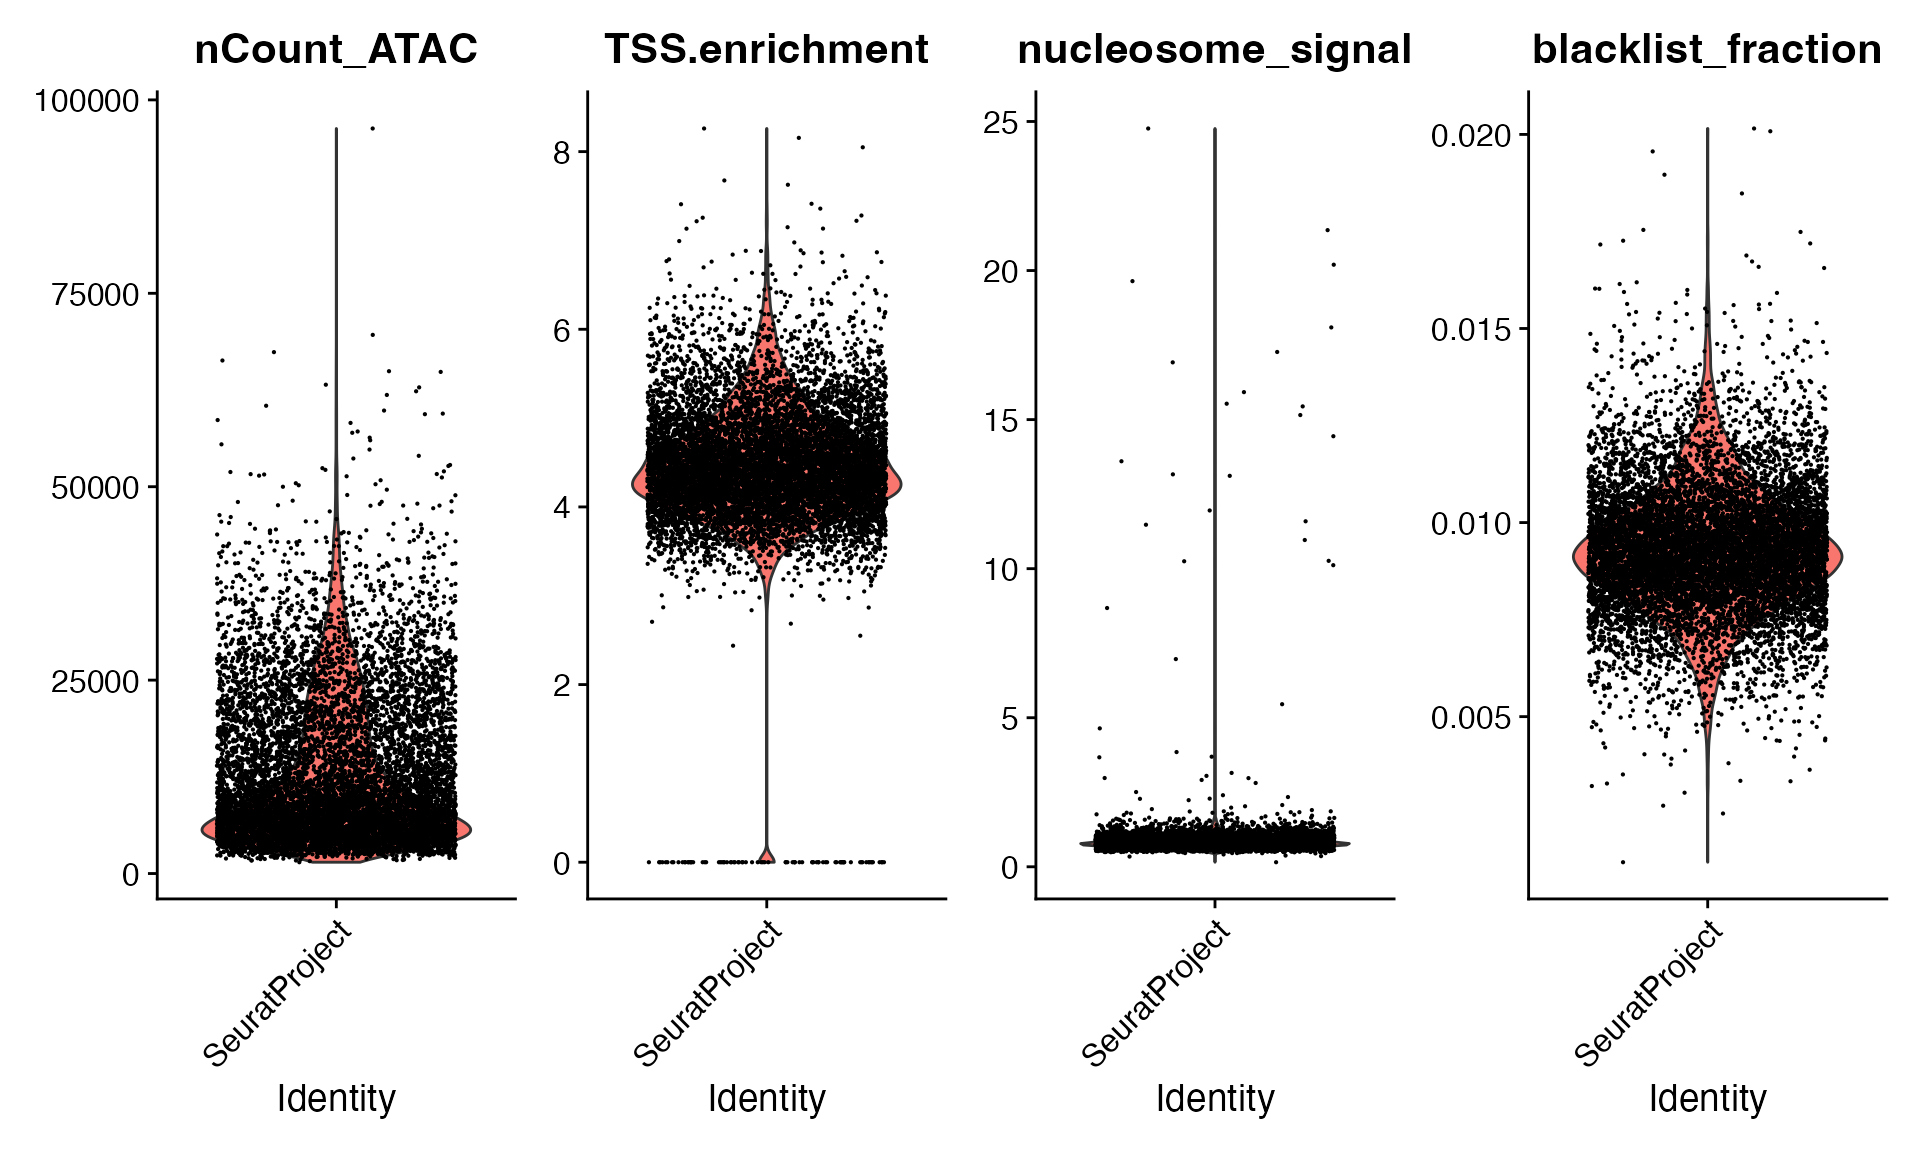
bone <- bone[, (bone$nCount_ATAC < 50000) &
               (bone$TSS.enrichment > 2) &
               (bone$nucleosome_signal < 5)]
数据预处理
接下来,可以使用 Signac 运行标准 scATAC-seq 分析管道来执行降维、聚类和细胞类型注释。
bone <- FindTopFeatures(bone, min.cells = 10)
bone <- RunTFIDF(bone)
bone <- RunSVD(bone, n = 100)
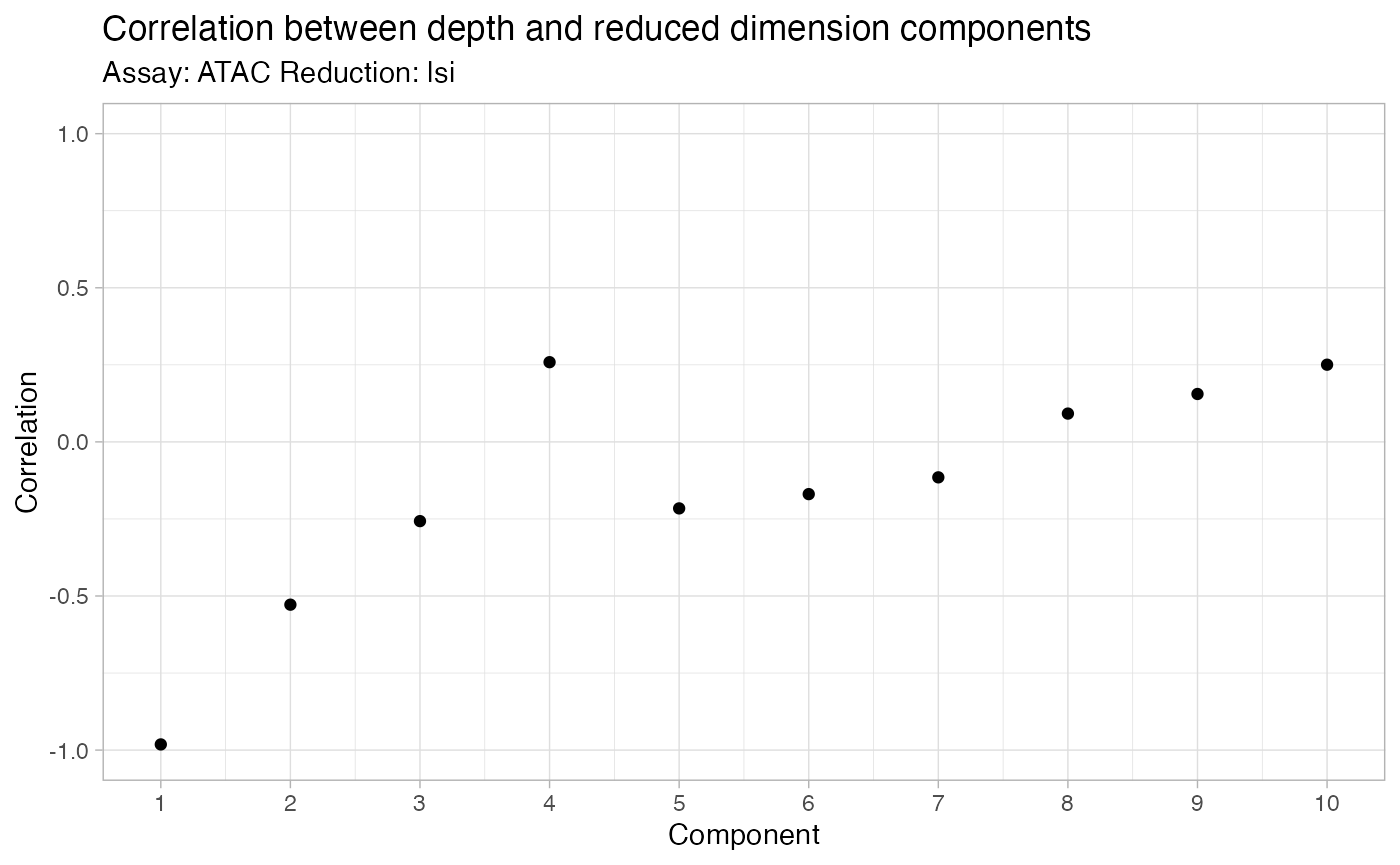
DepthCor(bone)
bone <- RunUMAP(
  bone,
  reduction = "lsi",
  dims = 2:50,
  reduction.name = "UMAP"
)

bone <- FindNeighbors(bone, dims = 2:50, reduction = "lsi")
bone <- FindClusters(bone, resolution = 0.8, algorithm = 3)

## Modularity Optimizer version 1.3.0 by Ludo Waltman and Nees Jan van Eck
##
## Number of nodes: 9765
## Number of edges: 433498
##
## Running smart local moving algorithm...
## Maximum modularity in 10 random starts: 0.8474
## Number of communities: 18
## Elapsed time: 4 seconds

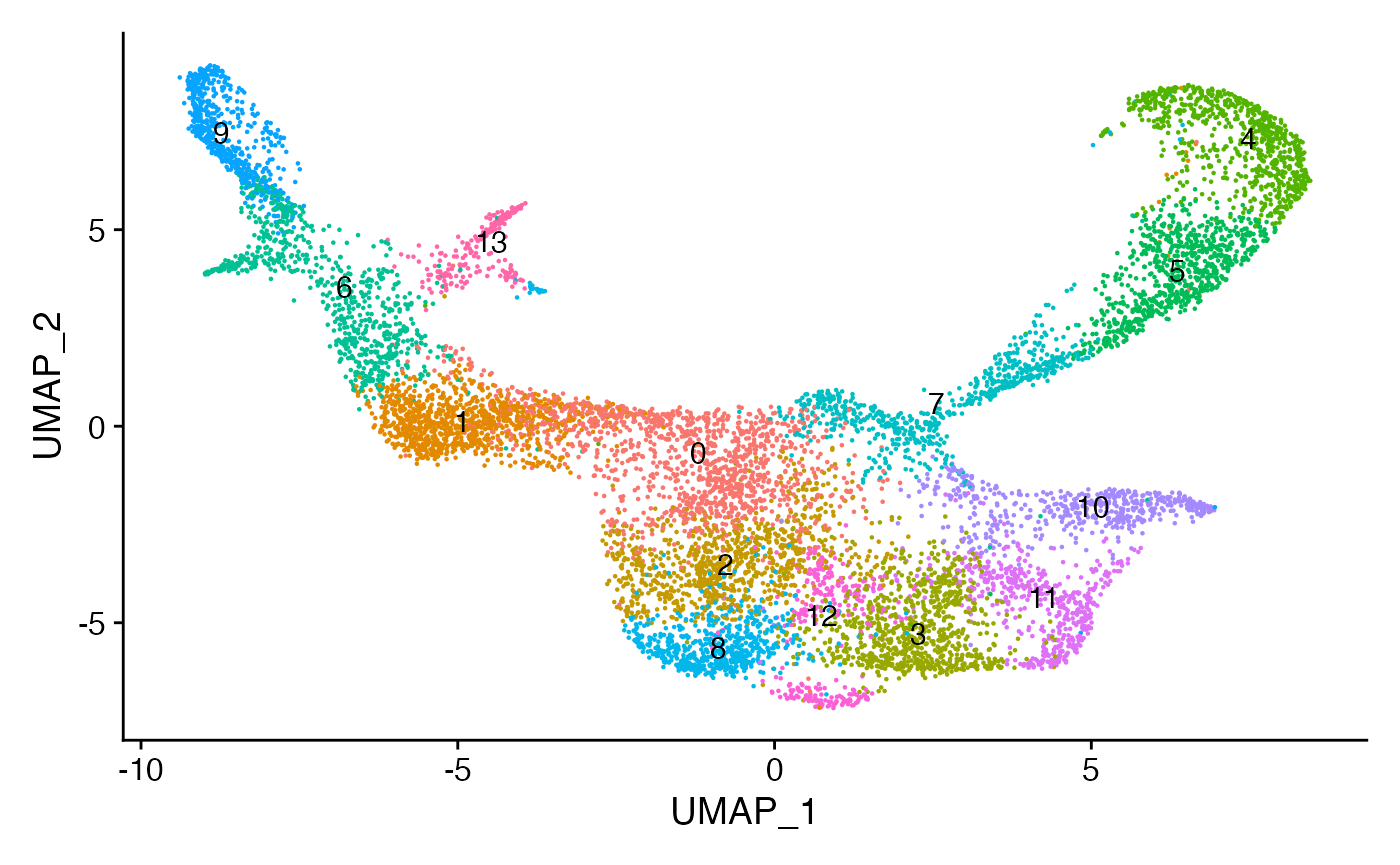
DimPlot(bone, label = TRUE) + NoLegend()
根据论文的原始注释,将每个簇分配给最常见的细胞类型。
for(i in levels(bone)) {
  cells_to_reid <- WhichCells(bone, idents = i)
  newid <- names(sort(table(bone$celltype[cells_to_reid]),decreasing=TRUE))[1]
  Idents(bone, cells = cells_to_reid) <- newid
}
bone$assigned_celltype <- Idents(bone)

DimPlot(bone, label = TRUE)
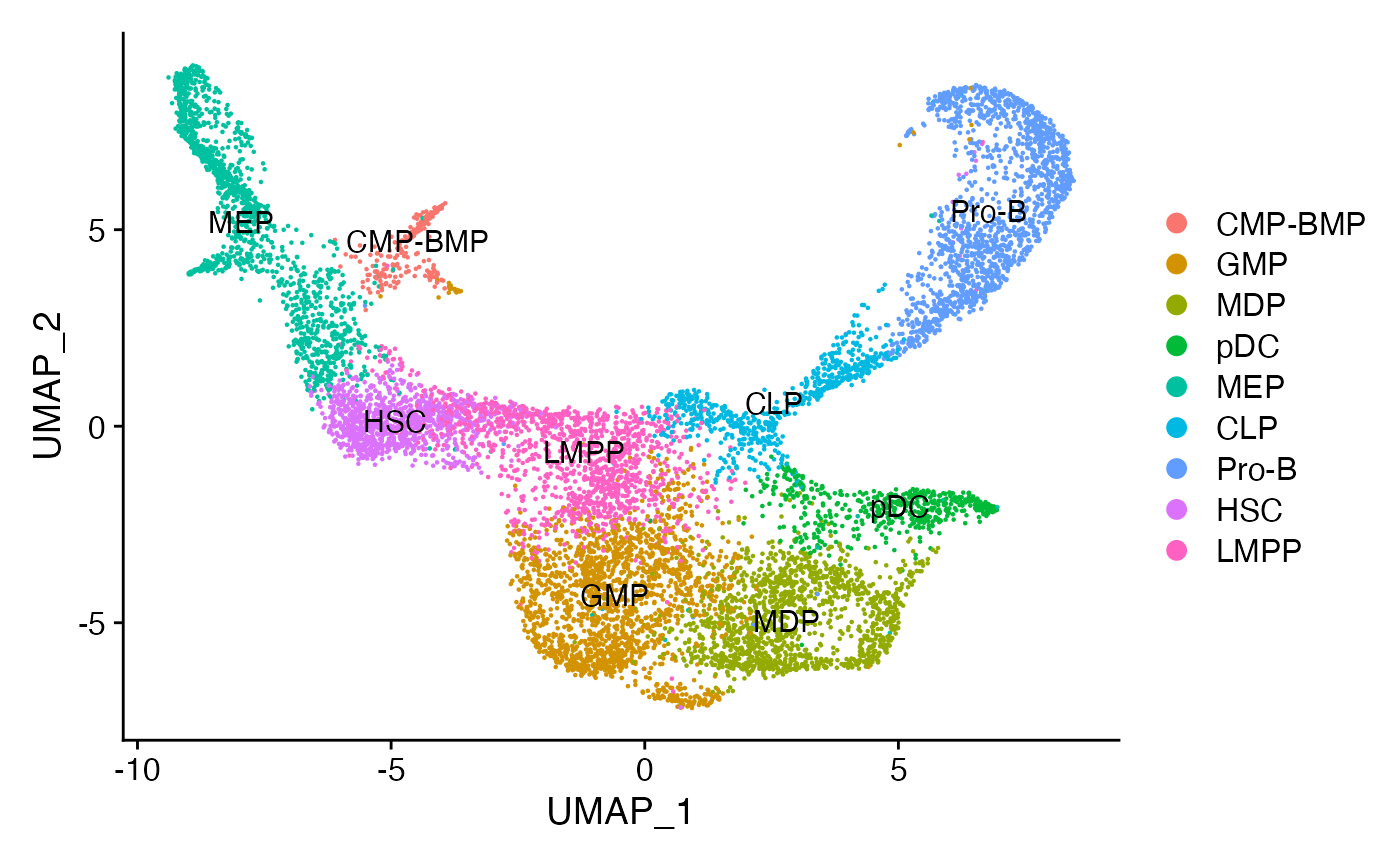
接下来,可以对不同的谱系进行子集化,并为每个谱系创建一个轨迹。构建轨迹的另一种方法是使用整个数据集,并为 Monocle 3 发现的不同细胞分区构建单独的伪时间轨迹。
DefaultAssay(bone) <- "ATAC"

erythroid <- bone[,  bone$assigned_celltype %in% c("HSC", "MEP", "CMP-BMP")]
lymphoid <- bone[, bone$assigned_celltype %in% c("HSC", "LMPP", "GMP", "CLP", "Pro-B", "pDC", "MDP", "GMP")]
使用 Monocle 3 构建细胞发育轨迹
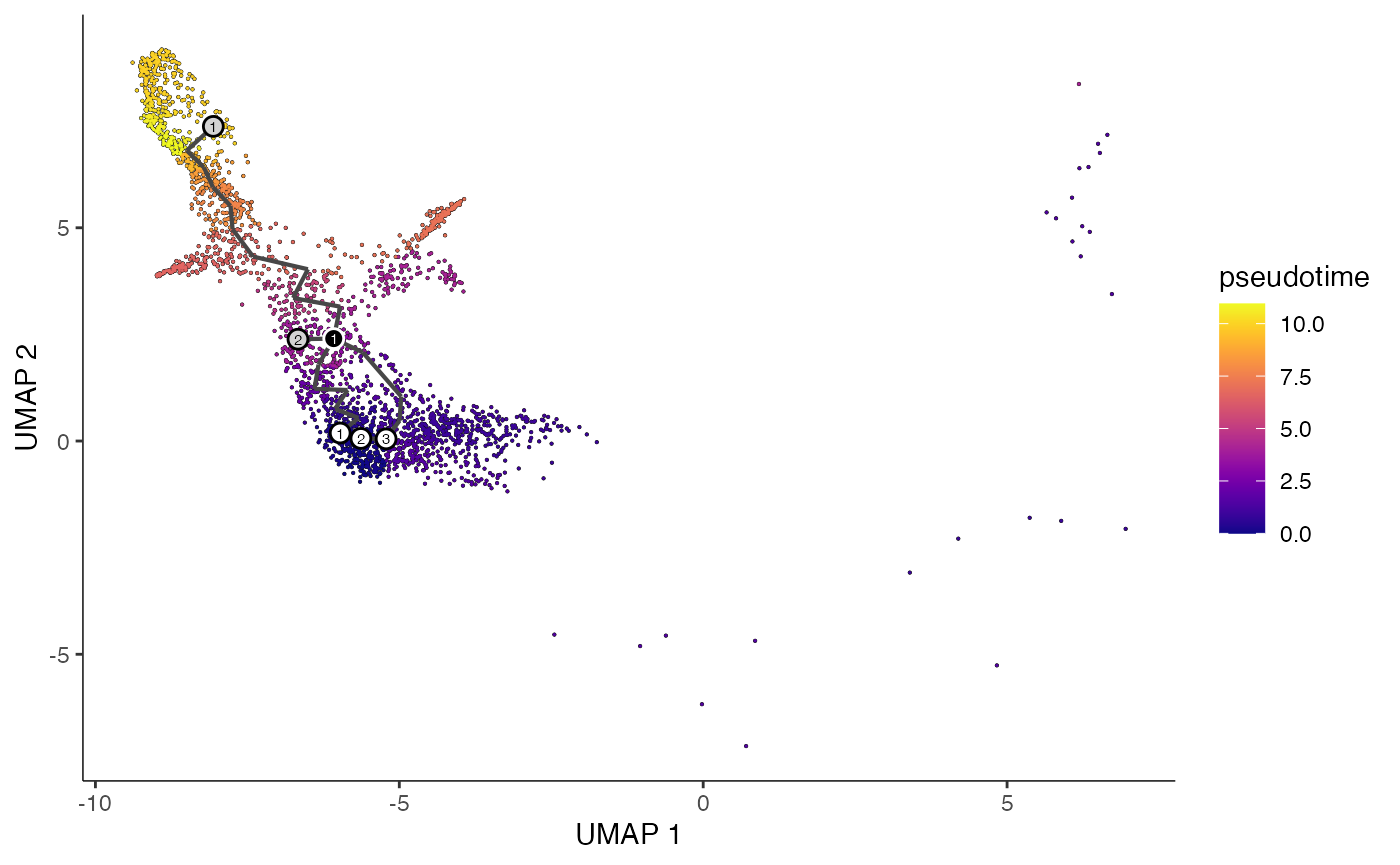
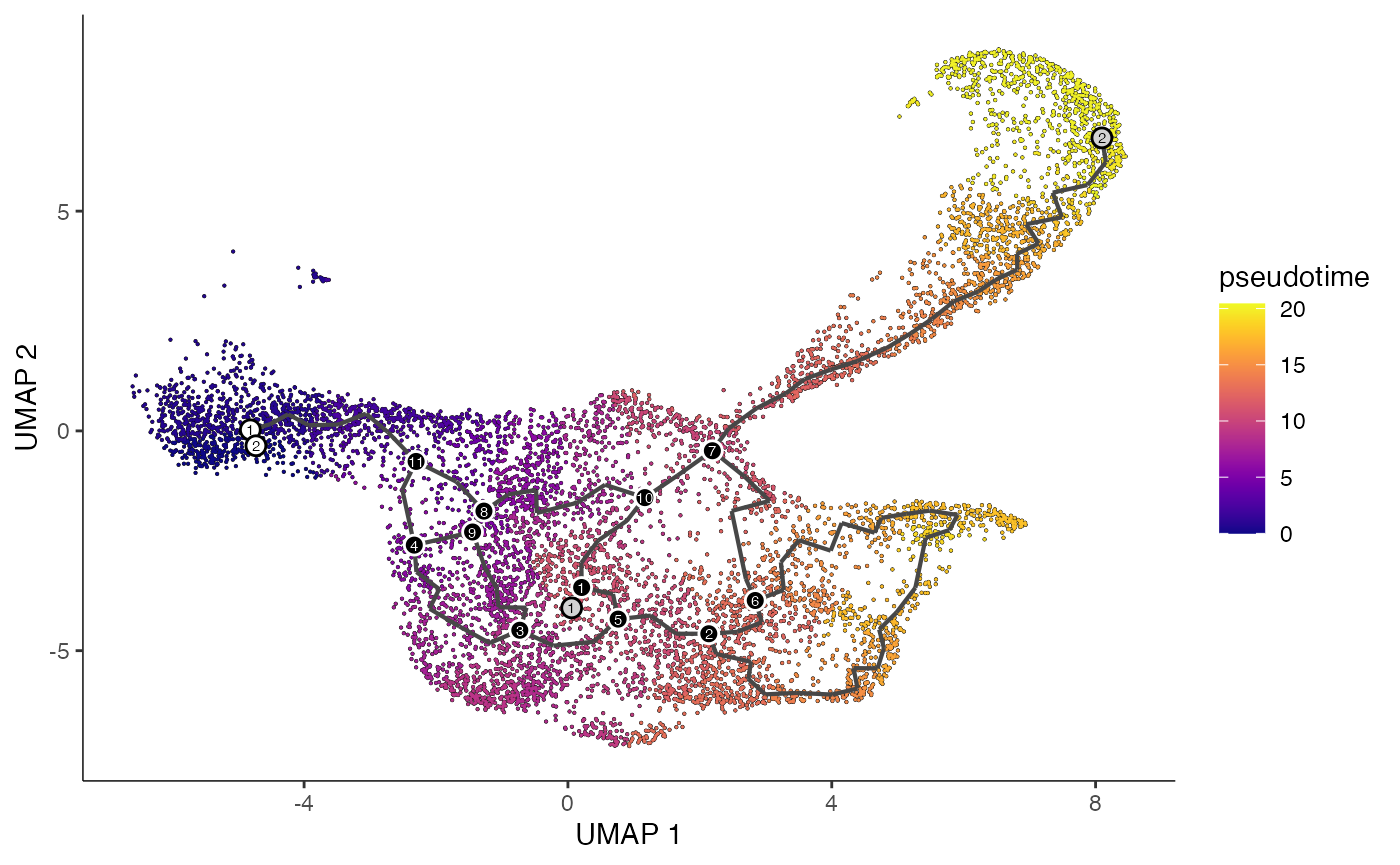
可以通过 SeuratWrappers 包中的 as.cell_data_set() 函数将 Seurat 对象转换成 CellDataSet 对象,并利用 Monocle 3 来构建细胞的发展轨迹。虽然会分别针对红细胞和淋巴细胞系列来构建它们的轨迹,但你同样可以尝试将所有细胞系列合并在一起来构建一个统一的轨迹。
erythroid.cds <- as.cell_data_set(erythroid)
erythroid.cds <- cluster_cells(cds = erythroid.cds, reduction_method = "UMAP")
erythroid.cds <- learn_graph(erythroid.cds, use_partition = TRUE)

lymphoid.cds <- as.cell_data_set(lymphoid)
lymphoid.cds <- cluster_cells(cds = lymphoid.cds, reduction_method = "UMAP")
lymphoid.cds <- learn_graph(lymphoid.cds, use_partition = TRUE)
为了对每个细胞发展轨迹进行伪时间估算,首先需要确定每个轨迹的起始点。根据的理解,造血干细胞是轨迹中其他细胞类型的起源,因此可以将这些干细胞设定为轨迹的起点。Monocle 3 提供了一个交互式工具,允许用户在图形界面中选择哪些细胞作为轨迹的起点。如果在调用 order_cells() 函数时没有明确指定 root_cells 参数,该工具就会被激活。在这里,已经预先选定了一些细胞作为起点,并将这些选择保存到了一个文件中,以确保结果的可重现性。
# load the pre-selected HSCs
hsc <- readLines("hsc_cells.txt")

# order cells
erythroid.cds <- order_cells(erythroid.cds, reduction_method = "UMAP", root_cells = hsc)
lymphoid.cds <- order_cells(lymphoid.cds, reduction_method = "UMAP", root_cells = hsc)

# plot trajectories colored by pseudotime
plot_cells(
  cds = erythroid.cds,
  color_cells_by = "pseudotime",
  show_trajectory_graph = TRUE
)
plot_cells(
  cds = lymphoid.cds,
  color_cells_by = "pseudotime",
  show_trajectory_graph = TRUE
)
提取伪时间值并添加到 Seurat 对象
bone <- AddMetaData(
  object = bone,
  metadata = erythroid.cds@principal_graph_aux@listData$UMAP$pseudotime,
  col.name = "Erythroid"
)

bone <- AddMetaData(
  object = bone,
  metadata = lymphoid.cds@principal_graph_aux@listData$UMAP$pseudotime,
  col.name = "Lymphoid"
)

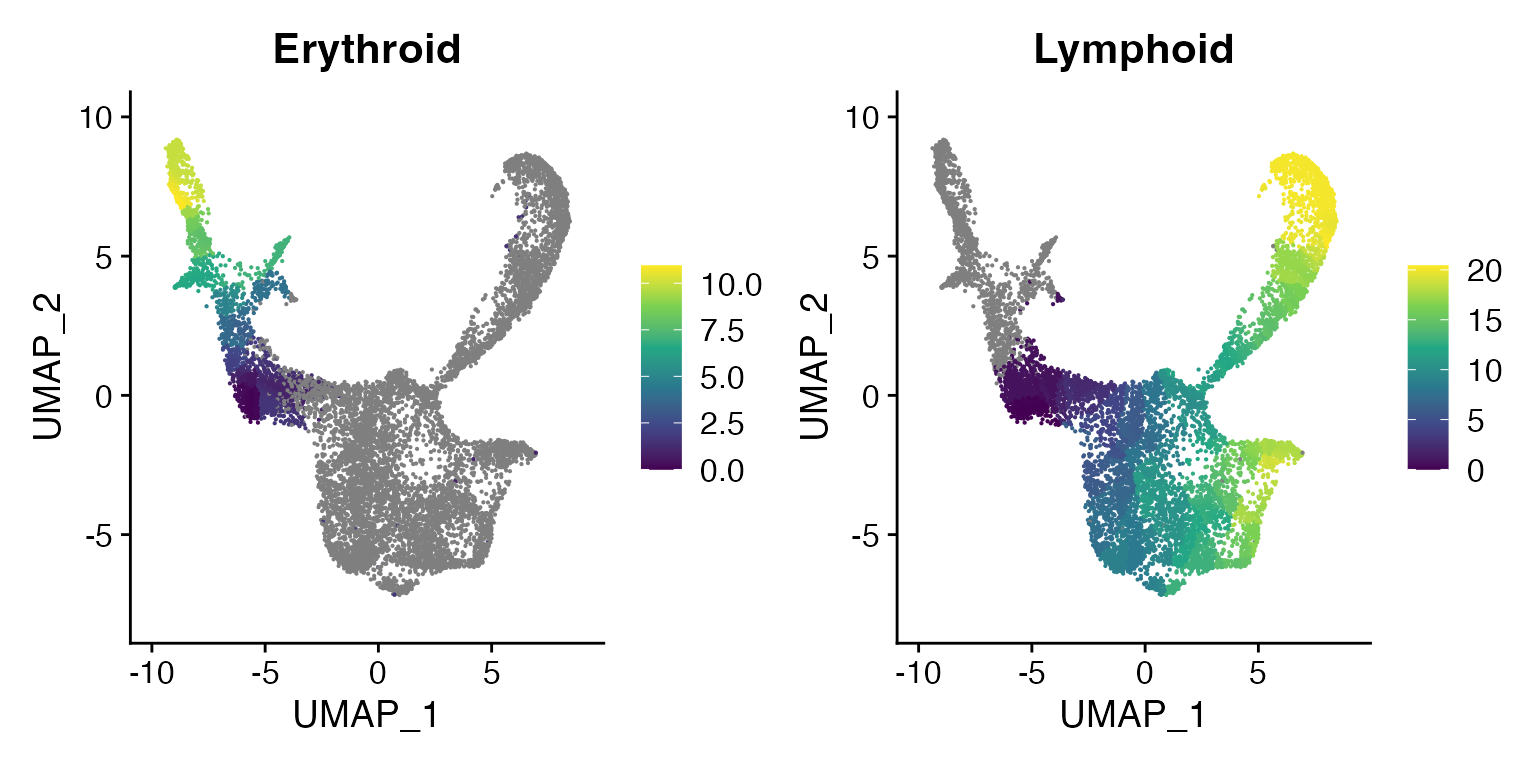
FeaturePlot(bone, c("Erythroid", "Lymphoid"), pt.size = 0.1) & scale_color_viridis_c()
